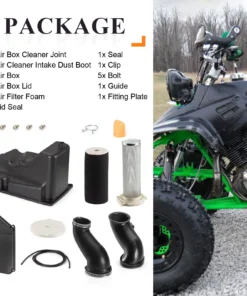
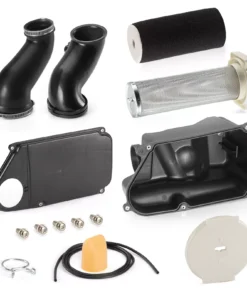
Air Filter Complete kit Guide for Yamaha Warrior 350 YFM350X 1987 1988 1989-2004
Ensure peak performance and longer engine life with the Air Filter Complete Kit for Yamaha Warrior 350 YFM350X (1987–2004). This all-in-one replacement kit includes a high-quality foam air filter, support cage, and all necessary mounting components for a hassle-free installation.
Designed to meet or exceed OEM specifications, this kit delivers enhanced airflow and superior filtration—keeping dirt, dust, and debris out of your engine while boosting throttle response and efficiency. Whether you’re restoring an older quad or upgrading your daily trail machine, this complete air filter kit is built to perform under rugged off-road conditions.
Compatible with Yamaha Warrior 350 models from 1987 through 2004, this kit is a direct fit with no modifications needed. Ideal for riders who demand reliable performance, easy maintenance, and long-lasting durability.
Would you like a version formatted specifically for eBay, Amazon, or another marketplace?
✅ Uses of the Air Filter Complete Kit for Yamaha Warrior 350 YFM350X (1987–2004)
-
Engine Protection: Filters out dust, dirt, sand, and debris to prevent engine damage and wear.
-
Improved Performance: Increases clean airflow to the engine for better throttle response and horsepower.
-
Routine Maintenance or Replacement: Ideal for routine service or replacing old, clogged, or damaged filters.
-
Off-Road & Trail Riding: Designed for use in rugged terrain where increased dust and debris are common.
-
OEM Replacement: Serves as a direct-fit replacement for the factory-installed air filter system on Yamaha Warrior 350 ATVs.
🔍 Properties of the Air Filter Complete Kit
-
Compatibility:
Specifically designed to fit Yamaha Warrior 350 YFM350X models from 1987 to 2004. -
Components Included:
-
Foam Air Filter (double-layer or oiled, depending on variant)
-
Inner Support Cage (steel or plastic)
-
Mounting hardware (if applicable)
-
Pre-oiled option for plug-and-play installation (varies by kit)
-
-
High Filtration Efficiency:
Multi-layer foam construction traps fine particles while maintaining excellent airflow. -
Durability:
Built with high-density foam and corrosion-resistant materials to withstand harsh trail and weather conditions. -
Washable & Reusable:
Many kits offer washable foam filters, allowing for multiple uses with proper maintenance. -
OEM-Style Fitment:
No modifications required—designed to match the stock airbox dimensions exactly.
⚙️ Manufacturing Process of the Air Filter Complete Kit
-
Material Selection
-
High-quality, open-cell polyurethane foam is chosen for its filtration performance and reusability.
-
Reinforced steel or plastic cages are selected for strength and structural support.
-
-
Foam Cutting & Shaping
-
Foam sheets are precisely cut and formed into cylindrical or cone-shaped filters to fit OEM airbox specifications.
-
In multi-stage filters, a coarse outer layer is combined with a finer inner layer for dual-stage filtration.
-
-
Support Cage Fabrication
-
Inner cages are molded or stamped from steel or injection-molded plastic.
-
Designed to maintain filter shape under suction pressure and ensure even airflow.
-
-
Assembly
-
Foam is bonded to end caps and support cages using high-strength, heat-resistant adhesive.
-
Some filters are pre-oiled using a specially formulated sticky oil to trap microscopic dust particles.
-
-
Quality Control
-
Each unit is inspected for material defects, proper bonding, and fitment.
-
Airflow and filtration efficiency may be tested in controlled environments for performance validation.
-
-
Packaging
-
Assembled kits are packaged with instructions and labeled for specific model years (1987–2004 Yamaha Warrior 350 YFM350X).
-
Some kits include installation tools or cleaning instructions depending on the manufacturer.
-
Would you like to include installation instructions, cleaning tips, or a comparison with OEM filters as well?
🔧 How to Use the Air Filter Complete Kit – Yamaha Warrior 350 YFM350X (1987–2004)
✅ 1. Prepare for Installation
-
Park the ATV on a flat surface and turn off the engine.
-
Allow the engine to cool down before working on it.
-
Gather basic tools such as a screwdriver or socket wrench (depending on airbox design).
✅ 2. Remove the Old Air Filter
-
Locate the airbox (typically under the seat or rear fender).
-
Open or unclip the airbox cover.
-
Carefully remove the old air filter and support cage.
-
Clean the inside of the airbox with a clean cloth to remove dirt and debris.
✅ 3. Inspect the New Filter Kit
-
Open the Air Filter Complete Kit and inspect all components:
-
Foam air filter
-
Support cage
-
Any included mounting hardware
-
-
If your filter is not pre-oiled, lightly apply air filter oil and squeeze out excess (do not soak).
✅ 4. Install the New Filter
-
Slide the foam air filter over the support cage (if separate).
-
Place the assembled filter into the airbox, aligning it with the intake tube.
-
Secure the filter using any clips, brackets, or hardware included with the kit or already in place.
✅ 5. Close the Airbox
-
Reattach the airbox cover securely, ensuring no gaps or loose seals.
-
Reinstall the seat or any panels removed during access.
✅ 6. Test the Engine
-
Start the ATV and let it idle for 1–2 minutes.
-
Check for proper airflow and smooth engine operation.
-
Make sure the airbox is sealed and there are no strange noises or leaks.
🧼 Maintenance Tips
-
Clean reusable filters every 10–20 hours of riding, or more often in dusty conditions.
-
Always reapply filter oil after cleaning and drying.
-
Replace the filter if foam becomes torn, brittle, or excessively dirty.
Reviews
There are no reviews yet.