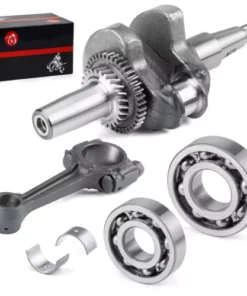
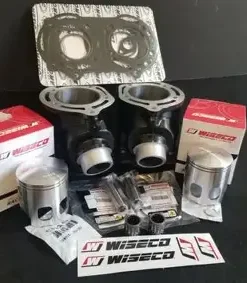
Crankshaft Connecting Rod Bearing For YAMAHA Golf Cart G2 G5 G8 G9 G11 G14 85-96 (For: Yamaha)
Upgrade your Yamaha golf cart’s engine performance with this premium Crankshaft Connecting Rod Bearing, specifically designed for Yamaha models G2, G5, G8, G9, G11, and G14 (1985–1996). This precision-engineered replacement part ensures a smooth, reliable fit and restores proper function to your cart’s internal engine components.
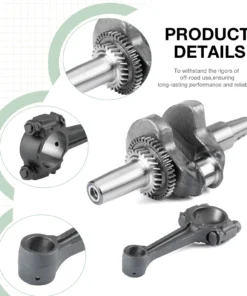
Manufactured to meet or exceed OEM specifications, this connecting rod bearing helps reduce engine friction, maintain oil clearance, and extend the lifespan of your engine. Ideal for rebuilds, repairs, or preventative maintenance, it’s the go-to choice for golf cart mechanics and DIY enthusiasts.
Compatible Yamaha Models:
✔ G2
✔ G5
✔ G8
✔ G9
✔ G11
✔ G14
(Years: 1985–1996)
Key Features:
-
Direct OEM-style replacement for worn rod bearings
-
Precision machined for exact fitment and smooth rotation
-
Designed to handle high heat and load conditions
-
Durable materials for long-lasting engine performance
-
Easy to install during engine rebuilds or maintenance
Whether you’re restoring an older cart or replacing worn components, this Crankshaft Connecting Rod Bearing is a dependable choice for keeping your Yamaha running strong on the course or off-road.
Let me know if you’d like to add installation instructions, part numbers, or cross-reference info for different suppliers or OEM catalogs.
🛠️ Crankshaft Connecting Rod Bearing
For Yamaha Golf Cart Models G2, G5, G8, G9, G11, G14 (1985–1996)
✅ Uses
The Crankshaft Connecting Rod Bearing plays a critical role in the internal operation of your golf cart’s engine. Its main function is to support and cushion the connecting rod’s motion on the crankshaft, allowing smooth rotation and minimizing wear caused by metal-on-metal contact.
Primary Uses:
-
Engine Rebuilds: Replaces worn or damaged rod bearings during major repairs or restorations.
-
Performance Maintenance: Ensures proper oil clearance and engine timing for optimal performance.
-
Vibration Reduction: Helps reduce knocking, friction, and vibration from crankshaft and connecting rod interaction.
-
Preventative Repair: Installed as a part of routine maintenance to avoid costly engine failure.
✅ Key Properties
Property | Description |
---|---|
Material Composition | High-strength alloy or tri-metal (commonly steel-backed with copper-lead or aluminum overlay) |
Heat Resistance | Designed to withstand high operating temperatures inside the engine |
Load-Bearing Capacity | Supports heavy reciprocating and rotating forces from the engine’s combustion cycle |
Precision Fit | Machined to exact tolerances for a tight fit and proper oil film clearance |
Corrosion Resistance | Coated or treated to resist corrosion and chemical degradation from engine oil |
Low Friction Surface | Engineered surface reduces wear and friction between rod and crank journal |
🏭 Manufacturing Process
The production of crankshaft connecting rod bearings involves a high-precision, multi-step process to ensure strength, durability, and accurate dimensions:
1. Material Selection
-
Bearings are made from multi-layer composite materials: steel backing for strength, with layers of copper-lead or aluminum alloys for friction control and embed-ability.
2. Metal Bonding & Cladding
-
A bonding process attaches the bearing surface materials to the steel shell.
-
Layers may include:
-
Steel base layer
-
Copper-lead or aluminum alloy mid-layer
-
Soft overlay (e.g., tin or lead alloy) for smoothness and protection
-
3. Forming & Shaping
-
The bearing shell is stamped or forged into its semi-circular shape.
-
Precision machining is used to ensure inner and outer diameters match engine specs exactly.
4. Surface Finishing
-
Bearings undergo fine grinding, polishing, and coating for a uniform surface and oil-retaining characteristics.
-
Some bearings include a grooved surface or oil hole to improve lubrication.
5. Quality Control & Testing
-
Bearings are tested for:
-
Dimensional accuracy
-
Material hardness and strength
-
Surface roughness and thickness
-
Resistance to fatigue and thermal stress
-
-
Non-destructive testing (NDT) methods like ultrasound or X-ray may be used to detect internal flaws.
6. Packaging & Labeling
-
Final products are carefully packaged in moisture-proof and anti-static packaging to prevent corrosion and contamination before installation.
-
Part numbers, torque specs, and application info are typically included on the label.
🧰 Why Choose This Bearing for Your Yamaha Golf Cart?
-
Designed to fit seamlessly into Yamaha G2–G14 engines (1985–1996)
-
Matches or exceeds OEM specifications
-
Supports smooth engine operation and helps extend engine life
-
Perfect for DIY repair, professional rebuilds, or routine maintenance
Let me know if you’d like this rewritten in a more technical, marketing-focused, or mechanic-friendly format (e.g., for repair manuals, product sheets, or e-commerce listings).
You said:
ChatGPT said:
Sure! Here’s a clear and professional guide on how to use and install the Crankshaft Connecting Rod Bearing for Yamaha Golf Cart G2, G5, G8, G9, G11, G14 (1985–1996). This can be used on a product page, manual, or customer FAQ.
🛠️ How to Use & Install Crankshaft Connecting Rod Bearing
(For Yamaha Golf Carts G2–G14 | Years 1985–1996)
⚠️ Before You Begin
🔧 Tools & Materials Needed
-
Socket set / torque wrench
-
Engine service manual (model-specific)
-
Plastigauge (for checking bearing clearance)
-
Engine assembly lube or oil
-
Clean workspace
-
Micrometer (optional, for precision measurements)
✅ Step-by-Step Instructions
1. Prepare the Engine
-
Disconnect the battery and remove the engine from the golf cart if necessary.
-
Drain the engine oil.
-
Disassemble the engine block to access the crankshaft and connecting rod assembly.
2. Remove Old Bearings
-
Detach the connecting rod cap from the crankshaft.
-
Carefully remove the old rod bearing halves from both the connecting rod and rod cap.
-
Inspect the crankshaft journal for scoring, wear, or damage. Clean thoroughly.
3. Check Bearing Clearance (Optional but Recommended)
-
Place a Plastigauge strip on the crank journal.
-
Install the new rod bearing halves into the connecting rod and cap.
-
Reinstall the cap and torque to spec (without rotating the crank).
-
Remove the cap and measure the Plastigauge flattening width to verify proper oil clearance.
-
Refer to Yamaha’s service manual for acceptable clearance specs.
4. Install New Bearings
-
Apply a thin layer of assembly lube or clean engine oil to the bearing surfaces.
-
Install one half of the new bearing into the connecting rod.
-
Install the second half into the rod cap, aligning oil holes if present.
5. Reassemble Connecting Rod
-
Carefully place the connecting rod back onto the crankshaft journal.
-
Reinstall the rod cap, making sure the bearing halves stay in place.
-
Torque bolts to manufacturer specifications (consult Yamaha manual).
6. Rotate & Check
-
Manually rotate the crankshaft to ensure smooth operation with no binding or resistance.
-
Reassemble the rest of the engine and reinstall it in the golf cart.
7. Final Steps
-
Refill with oil.
-
Reconnect battery and test run the engine.
-
Monitor for unusual noises or performance issues during the initial run-in period.
🧼 Post-Installation Tips
-
Change the oil after the first few hours of run time to remove any debris from the rebuild.
-
Regularly check engine performance and listen for knocking or unusual sounds.
-
Always follow Yamaha’s recommended maintenance intervals and torque specs.
⚠️ Safety Warning
-
Never reuse old bearings or install without lubrication.
-
Incorrect installation can cause engine failure or severe internal damage.
-
This part is intended for off-road vehicle use only and may not comply with on-road regulations.
Reviews
There are no reviews yet.