1969 Yamaha At1 125 2463
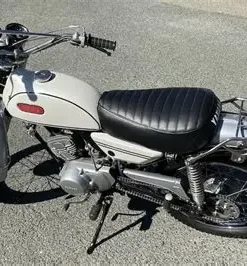
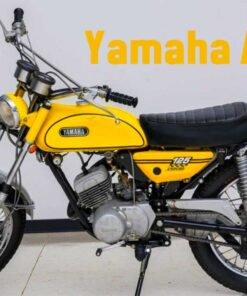
Discover a piece of motorcycle history with the 1969 Yamaha AT1 125 (Model 2463) – one of Yamaha’s early and iconic enduro bikes that helped define the dual-sport category. This lightweight 125cc 2-stroke motorcycle delivers classic performance both on and off-road, combining nimble handling with vintage style.
Introduced as part of Yamaha’s pioneering AT series, the AT1 125 features a single-cylinder, air-cooled, 2-stroke engine, 5-speed transmission, and rugged enduro frame. Its dual-purpose design made it a favorite among riders who wanted street-legal reliability with trail-ready capability.
Whether you’re a vintage motorcycle collector, a restorer, or a two-stroke enthusiast, the 1969 Yamaha AT1 offers a rare opportunity to own or rebuild an early Japanese enduro that helped pave the way for modern adventure bikes.
🔧 Key Specs (1969 Yamaha AT1 125 – Model 2463):
-
Engine: 125cc, 2-stroke, air-cooled, single-cylinder
-
Transmission: 5-speed manual
-
Starting System: Kick start
-
Frame Type: Steel tubular
-
Brakes: Drum front and rear
-
Weight: Approx. 220 lbs (dry)
-
Fuel Tank: 2.4 gallons (approx.)
-
Street Legal: Yes (with lighting and signals)
✅ Why It’s Special:
-
Early generation dual-sport motorcycle
-
Lightweight and easy to ride
-
Strong aftermarket and vintage parts availability
-
Great platform for full restoration
-
Appreciating collectible among vintage Yamaha models
Whether you’re restoring it to its factory glory or adding it to your vintage collection, the 1969 Yamaha AT1 125 (Model 2463) remains a true classic of the enduro era.
Would you like me to tailor this description for use on eBay, Facebook Marketplace, or a motorcycle parts store?
✅ USES of the 1969 Yamaha AT1 125 (Model 2463)
-
Dual-Sport Riding:
-
Designed as a dual-sport motorcycle, the AT1 125 can be ridden on both paved roads and off-road trails.
-
Its lightweight construction and 125cc engine make it ideal for riders looking for a versatile bike that can handle both on-road commuting and off-road adventures.
-
-
Vintage Motorcycle Collecting:
-
A classic 1969 Yamaha AT1 125 is highly sought after by vintage motorcycle collectors who appreciate the historic significance of early Japanese dirt bikes.
-
Its unique styling and engineering are cherished by enthusiasts of the 1960s-1970s Yamaha motorcycles.
-
-
Restoration Project:
-
For motorcycle restoration enthusiasts, the 1969 Yamaha AT1 125 is a popular project bike.
-
With the right parts and care, it can be fully restored to its original or modified condition, adding both functional and aesthetic value.
-
-
Beginner Riders and Youth:
-
Due to its smaller size and manageable power output, it is also a great bike for beginner riders or those looking for a smaller, more forgiving bike to learn on.
-
Its smooth throttle response and 5-speed gearbox allow for easy handling in various riding conditions.
-
-
Off-Road and Trail Use:
-
The bike’s rugged build and all-terrain capabilities make it an excellent option for light off-road and trail riding.
-
Its generous ground clearance and suspension travel make it a fun bike for short trail rides, forest paths, or light-duty motocross.
-
✅ PROPERTIES of the 1969 Yamaha AT1 125 (Model 2463)
Property | Description |
---|---|
Engine Type | 125cc, 2-stroke, air-cooled, single-cylinder |
Transmission | 5-speed manual transmission, chain drive |
Power Output | Approximately 10-12 horsepower (depending on condition) |
Starting System | Kick-start only |
Suspension | Front telescopic fork, rear dual shock absorbers |
Brakes | Drum brakes (front and rear) |
Frame Type | Steel tubular frame for lightweight durability and rigidity |
Weight | Approx. 220 lbs (dry) |
Fuel Tank Capacity | 2.4 gallons |
Tires | Off-road knobby tires, ideal for mixed terrain use |
Seat Height | Approximately 31 inches, offering a comfortable riding stance for most riders |
✅ MANUFACTURING PROCESS of the 1969 Yamaha AT1 125 (Model 2463)
-
Concept & Design Phase:
-
Yamaha’s design team set out to create a lightweight, reliable, and versatile bike that could handle both on-road and off-road conditions.
-
The AT1 125 was engineered with a focus on simplicity and durability, with special attention to ease of use and maintenance for riders of all skill levels.
-
-
Frame & Chassis Manufacturing:
-
The frame of the AT1 125 is constructed using steel tubing, chosen for its strength-to-weight ratio.
-
Precision machinery bends and welds the frame into shape, ensuring proper alignment and strength for handling off-road vibrations and impacts.
-
Frame sections are welded together, followed by heat treatment to ensure durability and rigidity.
-
-
Engine Manufacturing:
-
The engine is a single-cylinder, 2-stroke, air-cooled unit. Each component of the engine is cast and machined to precise specifications.
-
The engine block, cylinder head, and crankcase are molded using high-strength aluminum alloys to ensure light weight while maintaining strength.
-
The piston and crankshaft are forged for enhanced durability and performance.
-
Components are carefully assembled to ensure smooth operation, minimal friction, and maximum power output.
-
-
Suspension & Steering:
-
The front fork features telescopic suspension, allowing for smoother travel over rough terrain.
-
Rear suspension consists of dual shock absorbers mounted to the swingarm, allowing for better shock absorption on uneven ground.
-
Steering components, including the handlebars and linkage, are designed for quick and responsive handling.
-
-
Fuel System & Exhaust:
-
The AT1 125 uses a simple carburetor system to manage fuel delivery to the engine.
-
The exhaust system is designed for optimal power and fuel efficiency, with a single pipe leading to a rear-mounted silencer.
-
The exhaust system is welded and finished with a rust-resistant coating.
-
-
Assembly Process:
-
After all components are manufactured, the motorcycle undergoes final assembly.
-
The frame is first assembled with the engine, suspension, and wheels. The final fitment includes adding the gas tank, seat, handlebars, and electrical components like lights and indicators.
-
-
Finishing & Quality Control:
-
Once assembled, the AT1 125 undergoes a final inspection for quality control.
-
Every motorcycle is tested for engine performance, suspension function, and braking ability to ensure it meets Yamaha’s standards.
-
The bodywork is painted, typically in vintage color schemes like the iconic Yamaha blue, and decals are applied for brand recognition.
-
-
Packaging & Delivery:
-
Once the bikes are fully assembled and tested, they are packaged for shipment, either directly to dealerships or to the assembly line for export.
-
Manuals, tool kits, and instructions are included in the packaging for easy setup and maintenance by the buyer.
-
Would you like this content formatted into a technical spec sheet, product manual, or website listing?
✅ How to Use the 1969 Yamaha AT1 125 (Model 2463)
1. Pre-Ride Checks
Before riding your 1969 Yamaha AT1 125, it’s important to perform a quick pre-ride inspection to ensure everything is in proper working order.
-
Tires: Check tire pressure and tread condition for safe traction, especially if you plan to ride off-road.
-
Fuel: Ensure there’s enough fuel in the tank (approximately 2.4 gallons).
-
Oil Level: Check the 2-stroke oil level to ensure proper lubrication.
-
Brakes: Test the front and rear drum brakes for responsiveness.
-
Lights & Signals: Verify that all lights, indicators, and the horn are working if riding on the street.
-
Chain & Gears: Lubricate the chain and check its tension. Ensure the gears shift smoothly.
2. Starting the Engine
The 1969 Yamaha AT1 125 is equipped with a kickstarter, meaning it does not have an electric start. Here’s how to get the engine going:
-
Turn the Fuel Valve On:
-
Locate the fuel valve on the left side of the bike near the fuel tank.
-
Turn it to the “ON” position to allow fuel flow to the carburetor.
-
-
Choke:
-
If the bike is cold, use the choke. The choke lever is typically located on the left side of the handlebars or near the carburetor.
-
Move it to the “ON” position to enrich the fuel mixture for easier starting.
-
-
Kickstart the Engine:
-
Stand beside the bike and place your left foot on the left footpeg.
-
Stand upright and position your right foot on the kickstarter lever.
-
Press down firmly on the kickstarter with a quick, controlled motion to turn over the engine.
-
Repeat this motion if the engine does not start on the first kick, but avoid excessive kicking to prevent damage.
-
-
Adjust the Choke:
-
Once the engine starts, you can gradually move the choke lever back to the “OFF” position as the engine warms up. If you don’t have a choke lever, the bike may have an automatic choke system that adjusts on its own.
-
3. Riding the 1969 Yamaha AT1 125
Now that your AT1 is running, you can start riding it. Here’s how:
-
Engage the Gear:
-
Ensure the bike is in neutral before taking off. To check, look for the neutral indicator light on the dash or feel for the “middle” position when shifting.
-
Push the shift lever down to go into 1st gear. Use the clutch lever (left hand) to disengage the engine while shifting gears.
-
-
Throttle Control:
-
The throttle is controlled via the right handlebar grip. Twist it gently to increase engine speed and move forward.
-
Always be smooth with throttle inputs to avoid jerky acceleration, especially on rough trails.
-
-
Shifting Gears:
-
The AT1 125 has a 5-speed manual transmission.
-
To shift gears, pull in the clutch lever with your left hand, then use your left foot to shift the gear lever up or down.
-
Shift into higher gears as you gain speed, and downshift when slowing down or stopping.
-
-
Braking:
-
The front and rear drum brakes are operated using the right foot for the rear brake and the right hand for the front brake.
-
Always apply both brakes smoothly and progressively for safe stopping, especially on rough or loose terrain.
-
-
Cornering and Suspension:
-
Use the wide handlebars for easy and comfortable cornering.
-
The front telescopic forks and rear dual shock absorbers provide a smooth ride over bumps and uneven terrain. Lean into turns and use your body to help balance the bike, especially off-road.
-
4. Stopping the Bike
When you’re ready to stop:
-
Slow Down:
-
Gradually release the throttle and apply both the front and rear brakes.
-
Downshift through the gears to slow down, or use the clutch to disengage the engine if needed.
-
-
Bring the Bike to a Complete Stop:
-
Once at a stop, make sure you’re in neutral to avoid stalling when you restart.
-
Turn off the ignition when you’re finished riding to conserve battery life.
-
5. Post-Ride Maintenance
After each ride, it’s important to perform basic maintenance to keep the 1969 Yamaha AT1 125 in good working condition.
-
Clean the Bike: Remove mud, dirt, and debris from the frame, wheels, and engine to prevent buildup and corrosion.
-
Lubricate the Chain: Apply motorcycle chain lube and check the chain tension after every ride.
-
Check Fluid Levels: Make sure the fuel tank, oil levels, and brake fluid are within proper limits.
-
Inspect Tires: Examine the tires for wear or punctures, especially if you’ve ridden off-road.
-
Store Properly: If you’re not using the bike for a while, store it in a dry, cool location, and use a bike cover to protect it from the elements.
6. Additional Tips for Safe Riding
-
Wear Protective Gear: Always wear a helmet, gloves, knee and elbow pads, and appropriate riding gear for safety.
-
Know Your Terrain: Understand the terrain you’ll be riding on, especially if it’s rocky or heavily wooded.
-
Ride Responsibly: Avoid speeding, and always be mindful of other riders and wildlife when out on trails.
Reviews
There are no reviews yet.